- Docker - Home
- Docker - Overview
- Docker - Installing on Linux
- Docker - Installation
- Docker - Hub
- Docker - Images
- Docker - Containers
- Docker - Registries
- Docker - Compose
- Docker - Working With Containers
- Docker - Architecture
- Docker - Layers
- Docker - Container & Hosts
- Docker - Configuration
- Docker - Containers & Shells
- Docker - Dockerfile
- Docker - Building Files
- Docker - Public Repositories
- Docker - Managing Ports
- Docker - Web Server
- Docker - Commands
- Docker - Container Linking
- Docker - Data Storage
- Docker - Volumes
- Docker - Networking
- Docker - Security
- Docker - Toolbox
- Docker - Cloud
- Docker - Build Cloud
- Docker - Logging
- Docker - Continuous Integration
- Docker - Kubernetes Architecture
- Docker - Working of Kubernetes
- Docker - Generative AI
- Docker - Hosting
- Docker - Best Practices
- Docker - Setting Node.js
- Docker - Setting MongoDB
- Docker - Setting NGINX
- Docker - Setting ASP.Net
- Docker - Setting MySQL
- Docker - Setting Go
- Docker - Setting Rust
- Docker - Setting Apache
- Docker - Setting MariaDB
- Docker - Setting Jupyter
- Docker - Setting Portainer
- Docker - Setting Rstudio
- Docker - Setting Plex
- Docker Setting - Flame
- Docker Setting - PostgreSql
- Docker Setting - Mosquitto
- Docker Setting - Grafana
- Docker Setting - Nextcloud
- Docker Setting - Pawns
- Docker Setting - Ubuntu
- Docker Setting - RabbitMQ
- Docker - Setting Python
- Docker - Setting Java
- Docker - Setting Redis
- Docker - Setting Alpine
- Docker - Setting BusyBox
- Docker Setting - Traefik
- Docker Setting - WordPress
- Docker Useful Resources
- Docker - Quick Guide
- Docker - Useful Resources
- Docker - Discussion
Docker - Setting Flame
Flame is a self-hosted start page and dashboard for your server. Inspired by SUI, Flame is designed to offer you a central place to manage and organize apps, services, or links to your server. Moreover, Flame has an authentication mechanism to safeguard your bookmarks, programs, and settings. It is frequently utilized as a customized application hub in home labs, personal servers, and cloud environments.
In this chapter, we will be discussing the steps to dockerize Flame. Setting up Flame with Docker will allow you to run Flame in a container without manually configuring it and modifying the setup for different environments.
Prerequisites for Dockerizing Flame
Before starting this guide, make sure you have the following prerequisites −
- Docker Application − Make sure you have Docker installed on your local machine. You can download it from Docker's official website. It would be beneficial if you have a basic knowledge of Docker too.
- Docker Compose − Ensure you have Docker Compose installed in your machine if you want to set up Flame with Docker via Docker Compose. You can download it from here.
- Command Line Interface (CLI) − A basic knowledge of the command line interface (CLI) and its commands would help you better understand this guide.
- Text Editor − A text editor like VSCode or Sublime Text would be required for writing config files.
Setting up a Flame Project
Having a Docker image is necessary to run your container as it holds all the instructions and information like services that make up your application, environment variables, database, etc.
You can either create a custom Flame project which will act as the Docker image for your container or you can pull the pre-built Docker image. Creating a custom image gives you more control over the environment.
In this section, we are going to explain how you can create a custom Flame project.
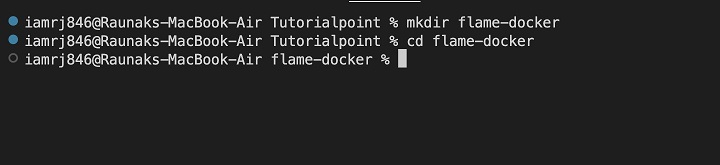
Step 1: Create a Project Directory
Create a project directory where all the files related to Flame will be stored.
# Create a folder named flame-docker
$ mkdir flame-docker

# Navigate into the directory
$ cd flame-docker
Step 2: Create a Basic Dockerfile
Next, create a Dockerfile which will be populated later on. This Dockerfile will contain all the instructions required to generate the Docker image.
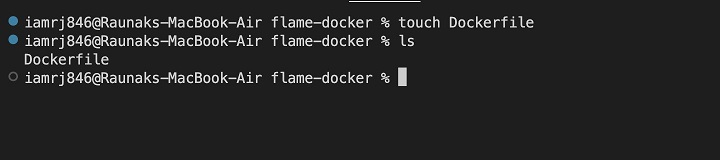
Open the Dockerfile in a text editor and add the following content to it −
# Base image for Flame
FROM pawelmalak/flame:latest

# Expose the default Flame port
EXPOSE 5005
The base image is set to the pawelmalak/flame and the exposed port is 5005.
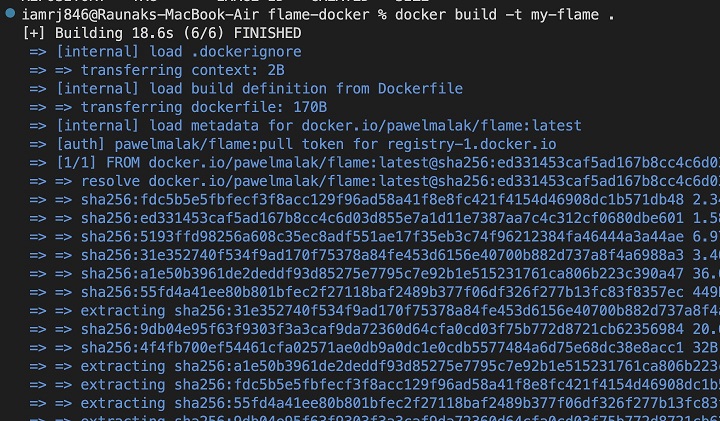
Step 3: Build a custom Docker Image
After creating the Dockerfile, its time to create a custom Docker image that will hold all the instructions to run the container.
# Build the Docker image with the tag "my-flame"
$ docker build -t my-flame .
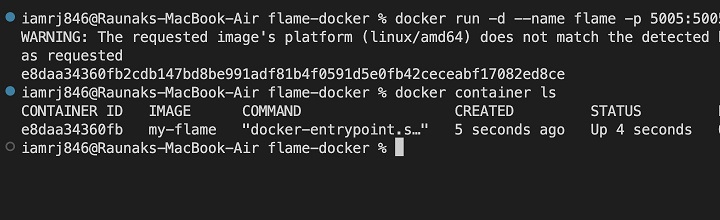
Step 4: Run the Flame Container
$ docker run -d --name flame -p 5005:5005 my-flame
Step 5: Persisting Data with Volumes
Flame stores its configurations and data such as bookmarks and settings in local JSON files. However, this data is not persistent, since as soon as you delete your container, you will lose all the data. To avoid this, you can use Docker volumes.
Docker volumes allow you to store the data permanently even if you delete the container.
$ docker run -d --name flame -p 5005:5005 -v ./flame-data:/app/data my-flame
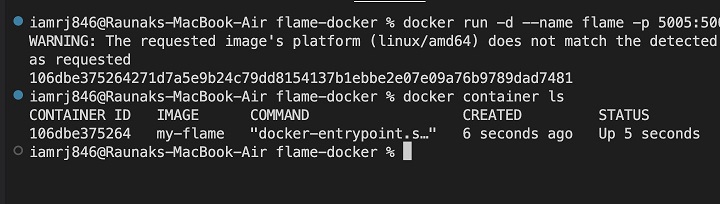
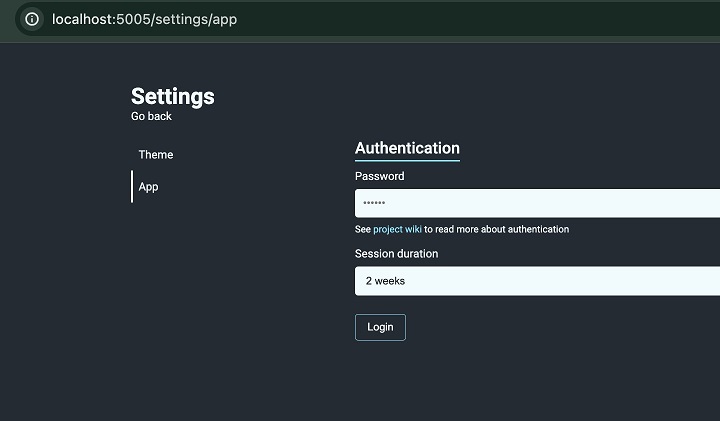
Step 6: Access the Flame Dashboard
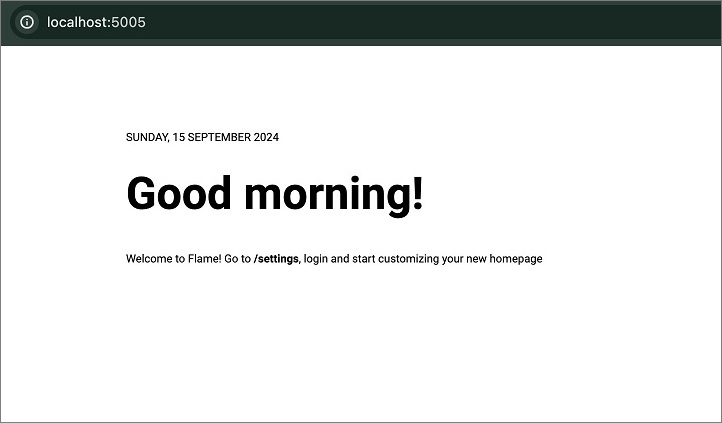
Now that our Flame container is running, you can visit localhost:5005 in your browser and access the Flame dashboard.
Using a pre-built Docker Image
If you dont want to create a custom Docker Image, you can simply use the pre-built official Docker image for Flame to install Flame in Docker.
Step 1: Pull the Flame Image
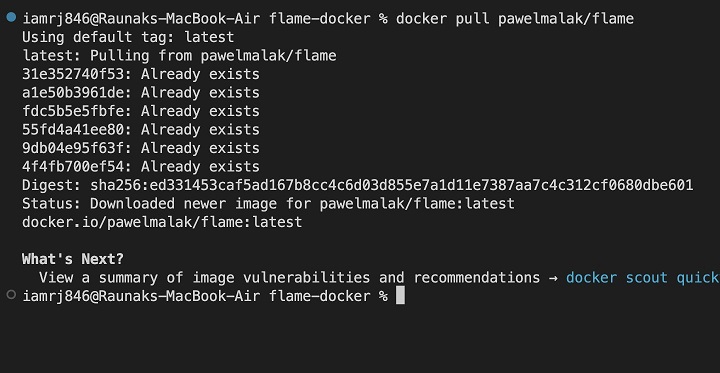
You need to pull the Docker image for Flame before running your Flame container.
$ docker pull pawelmalak/flame
Step 2: Run the Flame Container
Once you pull the Docker image, its time to run the Flame container.
$ docker run -d --name flame -p 5005:5005 pawelmalak/flame
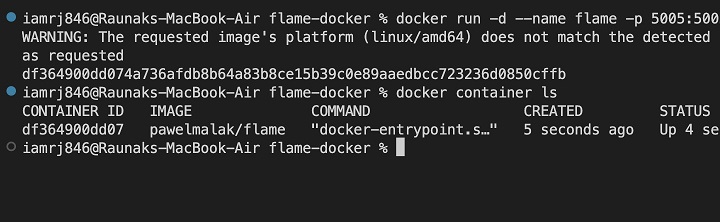
Where,
- -d = represents the detached mode which means this process will run in the background.
- --name flame = represents the name of your container.
- -p 5005:5005 = maps port 5005 on your local machine to port 5005 in the Flame container. This allows you to access Flames dashboard by visiting http://localhost:5005 on your browser.
- pawelmalak/flame = name of the docker image that is used to create the container.
Using Docker Compose to Set Up Flame
In this section, we will explain step-by-step how you can set up Flame using Docker Compose −
Step 1: Create a docker-compose.yml File
Create a docker-compose.yml file in your flame directory.
$ touch docker-compose.yml
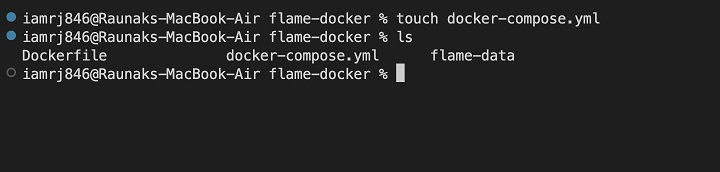
Your file structure should look like this now −
flame-docker/
 docker-compose.yml
 Dockerfile
 flame-data
Step 2: Populate .yml File
Open your docker-compose.yml file in a text editor and add the following configuration to it −
version: '3'

services:
  flame:
    image: pawelmalak/flame:latest
    container_name: flame
    restart: unless-stopped
    ports:
      - 5005:5005
    volumes:
      - ./flame-data:/app/data
Here,
- services − Specifies the services that make up this application
- image − Specifies the Docker image used, 'pawalmalak/flame' in this case
- container_name − Sets the name for the Flame container
- restart − Ensures that the container automatically restarts unless it's stopped manually
- ports − Maps port 5005 on your local machine to the container
- volumes − Volumes are used for storing the data permanently.
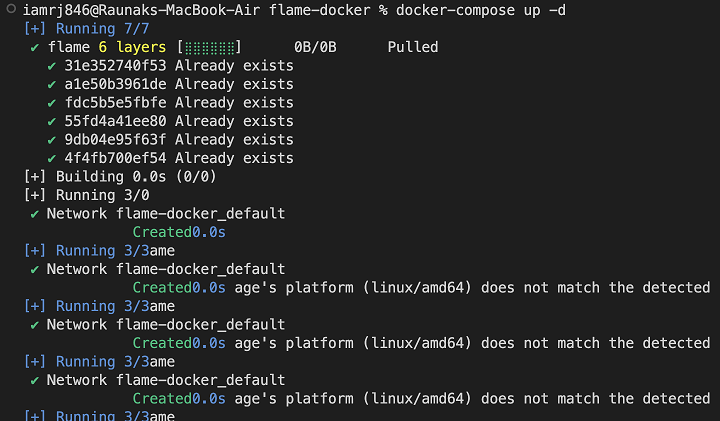
Step 3: Run Docker Compose
Run the docker-compose.yml file using the following command.
$ docker-compose up -d
Authentication Setup
Flame has an integrated authentication mechanism that allows you to limit who can access your dashboard. You can save your admin credentials in an .env file and reference it in your docker-compose.yml file for a more secure setup.
Step 1: Create a docker-compose.yml File
Create an env file in your Flame directory.
# Create a .env file
$ touch .env
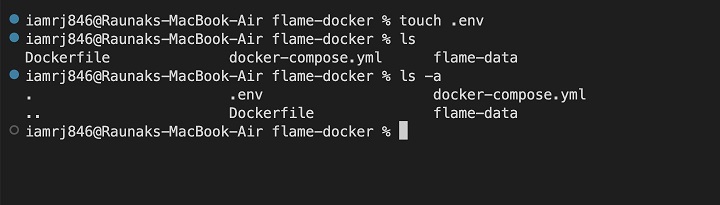
Open the .env file and add the following environment variables in it:
FLAME_ADMIN_USERNAME=admin
FLAME_ADMIN_PASSWORD=securepassword
Step 2: Update the docker-compose.yml
Update your docker-compose.yml file and add the path to your env file.
version: '3'

services:
  flame:
    image: pawelmalak/flame:latest
    container_name: flame
    restart: unless-stopped
    ports:
      - 5005:5005
    volumes:
      - ./flame-data:/app/data
    env_file:
      - .env
Step 3: Run docker-compose.yml file
$ docker-compose up -d
Your updated file structure will look like this now −
flame-docker/
 Dockerfile
 docker-compose.yml
 .env
 flame-data/  # Data volume for persistent storage
Conclusion
Your Flame container is successfully dockerized. You have created a Docker image and run it inside your Docker container ensuring consistency across different environments. This approach is more secure as running Flame in a Docker container isolates it from other services. If your container crashes, it wont affect your system at all. Consistency, portability, management, networking, and scalability are some other benefits of this approach.
FAQs on Setting Flame in Docker
We have collected here a set of Frequently Asked Questions on how to dockerize Flame container followed by their answers:
1. If the Flame container is terminated or removed, what would happen to my data?
Data stored on persistent storage using Docker volumes (like./flame-data:/app/data) will not be lost if the container is terminated or halted. Bookmarks, configuration files, and settings are among the data that are kept on your host machine in the flame-data directory.
Flame will be able to access your current data even if you delete the container because you can always recreate it with the same volume.
2. Can I use Flame with an external database like PostgreSQL?
No, Flame does not require or support third-party databases like MySQL or PostgreSQL. Flame is lightweight by design and saves its configurations and bookmarks in local files. These files are kept in the flame-data directory, which the Docker configuration has mounted as a volume.
Flame doesn't rely on databases by default; if you need database-like capabilities, you'll need to customize it or utilize an additional service.
3. How can I prevent unwanted access to my Flame instance?
Flame has an integrated authentication mechanism that lets you limit who can access the dashboard. You can explicitly set admin credentials in the docker-compose.yml file or in the.env file to secure Flame.
By protecting Flame behind an HTTPS-enabled reverse proxy and establishing firewall rules to limit access to the Flame port, you can further enhance security.