- Docker - Home
- Docker - Overview
- Docker - Installing on Linux
- Docker - Installation
- Docker - Hub
- Docker - Images
- Docker - Containers
- Docker - Registries
- Docker - Compose
- Docker - Working With Containers
- Docker - Architecture
- Docker - Layers
- Docker - Container & Hosts
- Docker - Configuration
- Docker - Containers & Shells
- Docker - Dockerfile
- Docker - Building Files
- Docker - Public Repositories
- Docker - Managing Ports
- Docker - Web Server
- Docker - Commands
- Docker - Container Linking
- Docker - Data Storage
- Docker - Volumes
- Docker - Networking
- Docker - Security
- Docker - Toolbox
- Docker - Cloud
- Docker - Build Cloud
- Docker - Logging
- Docker - Continuous Integration
- Docker - Kubernetes Architecture
- Docker - Working of Kubernetes
- Docker - Generative AI
- Docker - Hosting
- Docker - Best Practices
- Docker - Setting Node.js
- Docker - Setting MongoDB
- Docker - Setting NGINX
- Docker - Setting ASP.Net
- Docker - Setting MySQL
- Docker - Setting Go
- Docker - Setting Rust
- Docker - Setting Apache
- Docker - Setting MariaDB
- Docker - Setting Jupyter
- Docker - Setting Portainer
- Docker - Setting Rstudio
- Docker - Setting Plex
- Docker Setting - Flame
- Docker Setting - PostgreSql
- Docker Setting - Mosquitto
- Docker Setting - Grafana
- Docker Setting - Nextcloud
- Docker Setting - Pawns
- Docker Setting - Ubuntu
- Docker Setting - RabbitMQ
- Docker - Setting Python
- Docker - Setting Java
- Docker - Setting Redis
- Docker - Setting Alpine
- Docker - Setting BusyBox
- Docker Setting - Traefik
- Docker Setting - WordPress
- Docker Useful Resources
- Docker - Quick Guide
- Docker - Useful Resources
- Docker - Discussion
Docker - Setting Node.js
Dockerizing a Node.js application is a robust way to package your application and its dependencies into a contained and reproducible unit. This ensures uniformity in deployments across different environments and eases the development-to-production workflow.
In this chapter, we will take you on a journey from setting up a NodeJs project to running the application inside a Docker container. We will cover important topics such as organizing the project, creating Dockerfiles, and managing containers. By the end of this chapter, you will fully understand how to Dockerize a Node.js application, but more importantly, be able to apply these concepts to your projects.
Prerequisites
Here are a few prerequisites that you should know before Dockerizing our Node.js application −
- Node.js and npm (or yarn) installed − These are essential for developing Node.js applications.
- Basic understanding of Node.js and Express.js − Familiarity with these frameworks will be helpful.
- A code editor or IDE − For writing and managing your code.
- A version control system (optional) − For managing your project's code (e.g., Git).
Create Repository
To organize your project, create a new Git repository −
Choose a repository name − Select a descriptive name for your project, such as node-blog.
Initialize a Git repository
git init
Create a remote repository (optional) − If you want to collaborate or back up your code, create a remote repository on a platform like GitHub, GitLab, or Bitbucket.
Directory Structure
We will be creating a simple blogging application. Create a directory structure for your project in the following manner −
node-blog/

 package.json

 index.js

 routes/

    posts.js

    users.js

 models/

    posts.js

    users.js

 controllers/

    postsController.js

    usersController.js

 public/

    index.html

 Dockerfile

 .gitignore
- package.json − Stores project dependencies and metadata.
- index.js − The main application entry point.
- routes − Contains route definitions for different API endpoints.
- models − Defines data models for your application.
- controllers − Handles business logic and interacts with models.
- public − Stores static files such as html, css, etc.
- Dockerfile − Defines the Docker image build instructions.
- .gitignore − Specifies files and directories to exclude from Git version control.
This structure will provide a solid foundation for your blogging application. You can adapt it based on your project's specific requirements.
Let's proceed to the next section: Adding a Route.
Adding a Route
Let's create a basic route to handle a GET request for the homepage of our blog.
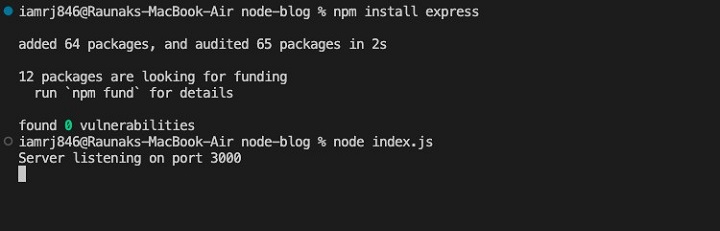
Steps 1. Install Express.js
$ npm install express
Steps 2. Install Bootstrap
$ npm install bootstrap
Steps 3. Create an index.js file
const express = require('express');
const app = express();
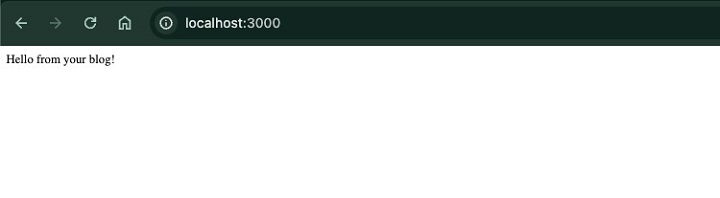
app.get('/', (req, res) => {
res.send('Hello from your blog!');
});
app.listen(3000, () => {
console.log('Server listening on port 3000');
});
Steps 4. Run the application
node index.js
Explanation
- First, we import the Express library and create an Express application instance.
- Then, we have defined a route using the app.get() method to handle GET requests to the root path ('/').
- The route handler sends a simple 'Hello from your blog!' message as a response.
- At the end, we start the server on port 3000.
Completing the Code
Before we dive into the code, let's establish the project structure −
project-directory/

   models/

      posts.js

      users.js

   controllers/

      postsController.js

      usersController.js

   routes/

      posts.js

      users.js

   public/

      index.html

   index.js
models/posts.js
let posts = [];
let nextId = 1;

const createPost = (title, content, authorId) => {
   const post = { id: nextId++, title, content, authorId };
   posts.push(post);
   return post;
};

const getPosts = () => {
   return posts;
};

const getPostById = (id) => {
   return posts.find(post => post.id === parseInt(id));
};

const updatePost = (id, title, content) => {
   const postIndex = posts.findIndex(post => post.id === parseInt(id));

   if (postIndex !== -1) {
      posts[postIndex] = { ...posts[postIndex], title, content };
      return posts[postIndex];
   }
   return null;
};

const deletePost = (id) => {
   const postIndex = posts.findIndex(post => post.id === parseInt(id));

   if (postIndex !== -1) {
      return posts.splice(postIndex, 1)[0];
   }
   return null;
};

module.exports = {
   createPost,
   getPosts,
   getPostById,
   updatePost,
   deletePost,
};
models/users.js
let users = [];
let nextUserId = 1;

const createUser = (username, email, password) => {
   const user = { id: nextUserId++, username, email, password };
   users.push(user);
   return user;
};

const getUserByUsername = (username) => {
   return users.find(user => user.username === username);
};

module.exports = {
   createUser,
   getUserByUsername,
};
controllers/postsController.js
const postsModel = require('../models/posts');

const getPosts = (req, res) => {
   const posts = postsModel.getPosts();
   res.json(posts);
};

const createPost = (req, res) => {
   const { title, content, authorId } = req.body;
   const post = postsModel.createPost(title, content, authorId);
   res.status(201).json(post);
};

const getPostById = (req, res) => {
   const { id } = req.params;
   const post = postsModel.getPostById(id);

   if (post) {
      res.json(post);
   } else {
      res.status(404).json({ message: 'Post not found' });
   }
};

const updatePost = (req, res) => {
   const { id } = req.params;
   const { title, content } = req.body;
   const updatedPost = postsModel.updatePost(id, title, content);

   if (updatedPost) {
      res.json(updatedPost);
   } else {
      res.status(404).json({ message: 'Post not found' });
   }
};

const deletePost = (req, res) => {
   const { id } = req.params;
   const deletedPost = postsModel.deletePost(id);

   if (deletedPost) {
      res.json({ message: 'Post deleted' });
   } else {
      res.status(404).json({ message: 'Post not found' });
   }
};

module.exports = {
   getPosts,
   createPost,
   getPostById,
   updatePost,
   deletePost,
};
controllers/usersController.js
const usersModel = require('../models/users');

const createUser = (req, res) => {
   const { username, email, password } = req.body;
   const user = usersModel.createUser(username, email, password);
   res.status(201).json(user);
};

const getUserByUsername = (req, res) => {
   const { username } = req.params;
   const user = usersModel.getUserByUsername(username);

   if (user) {
      res.json(user);
   } else {
      res.status(404).json({ message: 'User not found' });
   }
};

module.exports = {
   createUser,
   getUserByUsername,
};
routes/posts.js
const express = require('express');
const router = express.Router();
const postsController = require('../controllers/postsController');

router.get('/', postsController.getPosts);
router.post('/', postsController.createPost);
router.get('/:id', postsController.getPostById);
router.put('/:id', postsController.updatePost);
router.delete('/:id', postsController.deletePost);
module.exports = router;
routes/users.js
const express = require('express');
const router = express.Router();
const usersController = require('../controllers/usersController');

router.post('/', usersController.createUser);
router.get('/:username', usersController.getUserByUsername);

module.exports = router;
index.js
const express = require('express');
const path = require('path');
const posts = require('./routes/posts');
const users = require('./routes/users');

const app = express();
app.use(express.json());

// Import Bootstrap CSS
app.use('/css', express.static(path.join(__dirname, 'node_modules/bootstrap/dist/css')));
app.use(express.static(path.join(__dirname, 'public')));
app.use('/posts', posts);
app.use('/users', users);

app.get('/', (req, res) => {
   res.sendFile(path.join(__dirname, 'public', 'index.html'));
});

const port = process.env.PORT || 3000;
app.listen(port, () => {
   console.log(`Server listening on port ${port}`);
});
public/index.html
<!DOCTYPE html>
<html lang="en">
<head>
   <meta charset="UTF-8">
   <meta name="viewport" content="width=device-width, initial-scale=1.0">
   <title>My Blog</title>
   <link rel="stylesheet" href="/css/bootstrap.min.css">
</head>
<body>
   <div class="container">
      <div class="row">
         <div class="col-md-6">
            <form action="/users" method="POST">
               <div class="mb-3">
                  <label for="username" class="form-label">Username</label>
                  <input type="text" class="form-control" id="username" name="username" placeholder="Username">
               </div>
               <div class="mb-3">
                  <label for="email" class="form-label">Email</label>
                  <input type="email" class="form-control" id="email" name="email" placeholder="Email">
               </div>
               <div class="mb-3">
                  <label for="password" class="form-label">Password</label>
                  <input type="password" class="form-control" id="password" name="password" placeholder="Password">
               </div>
               <button type="submit" class="btn btn-primary">Create User</button>
            </form>
         </div>
         <div class="col-md-6">
            <form action="/posts" method="POST">
               <div class="mb-3">
                  <label for="title" class="form-label">Title</label>
                  <input type="text" class="form-control" id="title" name="title" placeholder="Title">
               </div>
               <div class="mb-3">
                  <label for="content" class="form-label">Content</label>
                  <textarea class="form-control" id="content" name="content" rows="3"></textarea>
               </div>
               <button type="submit" class="btn btn-primary">Create Post</button>
            </form>
         </div>
      </div>
   </div>
   <script src="/js/bootstrap.bundle.min.js"></script>
</body>
</html>
Code Explanation
Models
- posts.js − Defines in-memory storage for posts, including CRUD operations (create, read, update, delete).
- users.js − Defines in-memory storage for users, including user creation and retrieval by username.
Controllers
- postsController.js − Handles HTTP requests related to posts, interacting with the posts model.
- usersController.js − Handles HTTP requests related to users, interacting with the users model.
Routes
- posts.js − Defines the API endpoints for posts (GET, POST, PUT, DELETE).
- users.js − Defines the API endpoints for users (POST, GET).
index.js
- Sets up the Express server.
- Defines the base URL for the API.
- Starts the server on a specified port.
Index.html
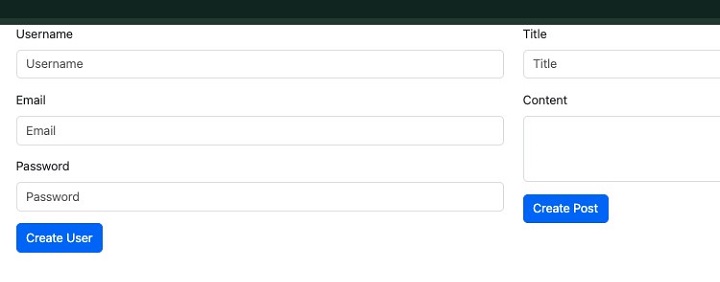
Here we have used Bootstrap and basic HTML to create a form that allows you to create and view users and posts.
Start the Application in Local
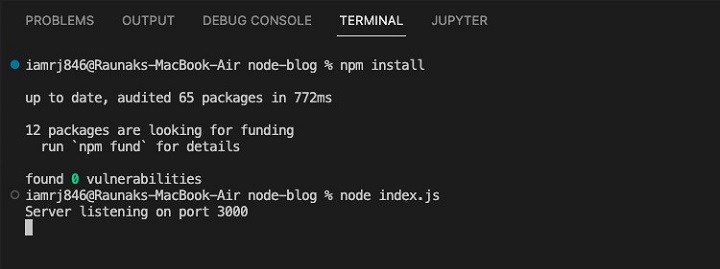
- Go to the project directory − Open your terminal or command prompt and go to the root directory of your project.
- Install dependencies − Run npm install to install the required dependencies listed in your package.json file.
- Start the development server − Execute node index.js to start the application.
Explanation
- The npm install command will fetch and install all the necessary packages for your application to function.
- Running node index.js executes the JavaScript file index.js, which is the entry point for your application. This starts the Node.js server.
Testing your application
Once the server is running, open a web browser and navigate to http://localhost:3000. You should see a response indicating that your application is working.
Note
- The default port is 3000, but you can change it by modifying the port number in your index.js file.
- You can use tools like nodemon for automatic restarts when code changes are made.
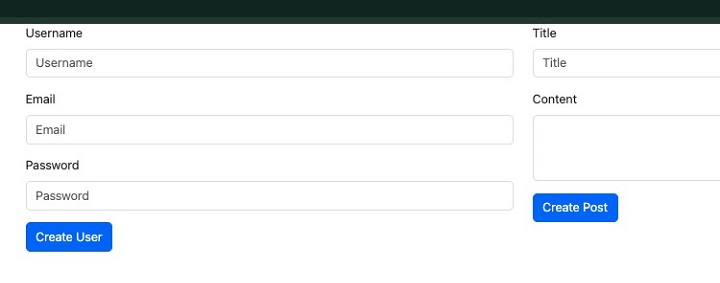
You can now create users and posts here.
Dockerizing the NodeJs Application
Let's create a file called Dockerfile in the project's root directory with the following content
# Use a Node.js image as the base

FROM node:18-alpine

# Set the working directory

WORKDIR /app

# Copy package.json and package-lock.json to install dependencies

COPY package*.json ./

# Install dependencies

RUN npm install

# Copy the rest of the application code

COPY . .

# Expose the port your app will listen on

EXPOSE 3000

# Start the app

CMD ["node", "index.js"]
Explanation of the Dockerfile
- FROM node:18-alpine − We will use a Node.js 18 image as the base image for our Docker image.
- WORKDIR /app − It will set the working directory inside the container to /app.
- COPY package*.json ./ − It will package.json and package-lock.json to the working directory.
- RUN npm install − Installs the project dependencies.
- COPY . . − Copies the entire project to the container.
- EXPOSE 3000 − Exposes port 3000 for the application.
- CMD ["node", "index.js"] − Specifies the command to run when the container starts.
Building the Docker Image
To build the Docker image, you can run the following command in your terminal −
$ docker build -t my-node-app .
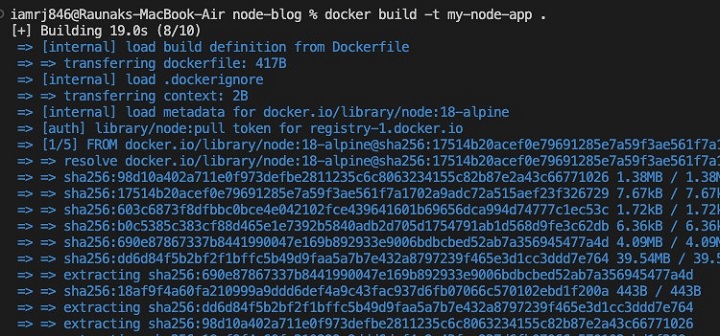
This command builds the Docker image and tags it as my-node-app.
Running the Docker Container
To run the Docker container, use the following command −
$ docker run -p 3000:3000 my-node-app
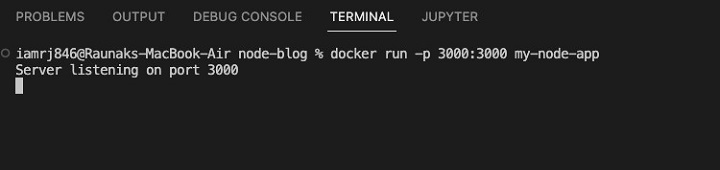
This command creates a container from the my-node-app image and then maps port 3000 of the container to port 3000 of your host, and starts the container.
Now, you can access your application at http://localhost:3000.
Conclusion
In this chapter, we have walked through all the steps in developing a Node.js blogging application and containerizing it using Docker. You now know how to organize your project, deal with user interaction, package an application for deployment effectively, and create base images from which other Dockers can be built.
Although this tutorial was very basic, you should add features, security measures, database integration, etc. if you are planning to make this application production-ready. Dockerization will let you streamline all your development, testing, and deployment processes to make sure that your application behavior is the same in all environments.
FAQs on Setting Node.js in Docker
1. What are the best practices for optimizing a Docker image for a Node.js application?
The best practice for Docker image optimization is to use the minimum base image size with a lean Node.js runtime, only install dependencies that your application needs, and leverage build caching. You can use a production-ready Node.js image and further optimize it with better methods for package management.
2. How do I handle environment variables in a Dockerized Node.js application?
You can set environment variables in a Dockerfile using the ENV instruction, but the best practice is to pass it at runtime via the -e flag. You could use environment variables for configuration to enhance flexibility and security.
3. How can I debug a Node.js application running in a Docker container?
You can debug a Node.js application running inside a Docker container using remote debugging tools like Node.js itself, Visual Studio Code with the remote debugging extension, or other third-party tools. Expose the debugging port in your Dockerfile and configure your IDE appropriately.