- Git - Home
- Git - Version Control
- Git - Basic Concepts
- Git - Command Line
- Git - Installation
- Git - First Time Setup
- Git - Basic Commands
- Git - Getting Help
- Git - Tools
- Git - Cheat Sheet
- Git - Terminology
- Git - Life Cycle
- Git - Get a Repository
- Git - Adding New Files
- Git - Recording Changes
- Git - Viewing Commit History
- Git Branching
- Git - Branches in a Nutshell
- Git - Creating a New Branch
- Git - Switching Branches
- Git - Branching and Merging
- Git - Merge Conflicts
- Git - Managing Branches
- Git - Branching Workflows
- Git - Remote Branches
- Git - Tracking Branches
- Git - Rebasing
- Git - Rebase vs. Merge
- Git - Squash Commits
- Git Operations
- Git - Clone Operation
- Git - Tagging Operation
- Git - Aliases Operation
- Git - Commit Operation
- Git - Stash Operation
- Git - Move Operation
- Git - Rename Operation
- Git - Push Operation
- Git - Pull Operation
- Git - Fork Operation
- Git - Patch Operation
- Git - Diff Operation
- Git - Status Operation
- Git - Log Operation
- Git - Head Operation
- Git - Origin Master
- Git Undoing
- Git - Undoing Changes
- Git - Checkout
- Git - Revert
- Git - Reset
- Git - Restore Operation
- Git - Rm
- Git - Switch Operation
- Git - Cherry-pick
- Git - Amend
- Git on the Server
- Git - Local Protocol
- Git - Smart HTTP Protocol
- Git - Dumb HTTP Protocol
- Git - The SSH Protocol
- Git - The Git Protocol
- Git - Getting Git on a Server
- Git - Setting up the Server
- Git - Daemon
- Git - GitWeb
- Git - GitLab
- Git - Third Party Hosted Options
- Distributed Git
- Git - Distributed Workflows
- Git - Contributing to a Project
- Git - Maintaining a Project
- Customizing Git
- Git - Configuration
- Git - Hooks
- Git - Attributes
- Git - Init
- Git - Commit
Git - Switching Branch
Switching branches in Git is a fundamental operation that allows developers to work on different aspects of a project simultaneously without interfering with the main codebase.
Why Switch Branches?
Switching branches is essential for maintaining a clean and organized codebase. Here are a few scenarios where switching branches becomes necessary:
Feature Development: When you're working on a new feature, it's best to do so on a separate branch. This allows you to make as many changes as needed without affecting the stable code in the main branch.
Bug Fixes: If a bug is discovered while you're working on a feature, you can switch to a new branch dedicated to fixing the bug. Once the fix is complete, you can merge it back into the main codebase.
Code Reviews: Before merging a branch into the main branch, it's common practice to review the code. By keeping the changes on a separate branch, you can ensure that only reviewed and approved code gets merged.
Experimentation: If you're unsure about a particular approach or need to test something, you can create an experimental branch. If the experiment fails, you can simply delete the branch without affecting the main codebase.
How to Switch Branches in Git
Use the git checkout command in Git to switch to an existing branch. This command updates the files in your working directory to match the state of the branch you're switching to.
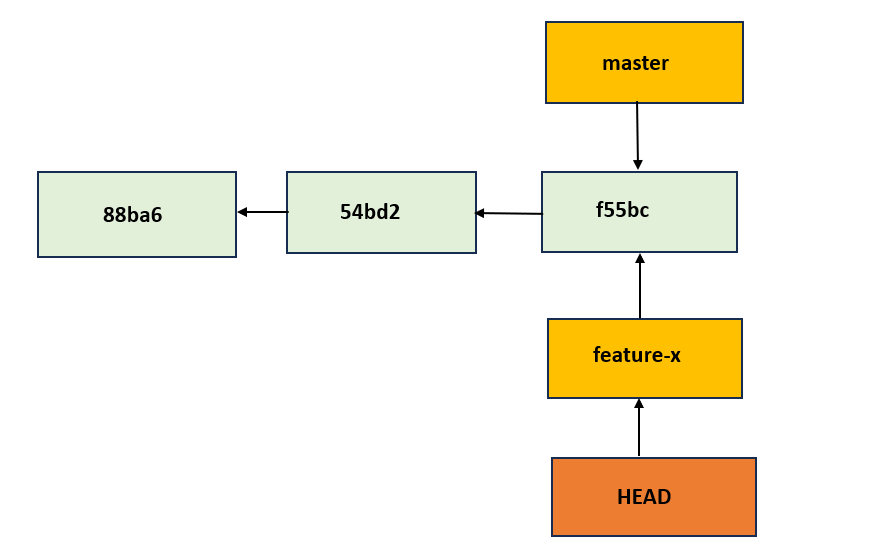
Let's switch to the branch named feature-x
$ git checkout feature-x
By running this command, the feature-x branch is referenced by HEAD.
The feature-x branch pointer will move forward in the commit history with each modification made and committed after this.
Let's say we make changes to a file and commit changes on the feature-x branch:
$ vim test.htm  # Make some changes
$ git commit -a -m 'Update feature'
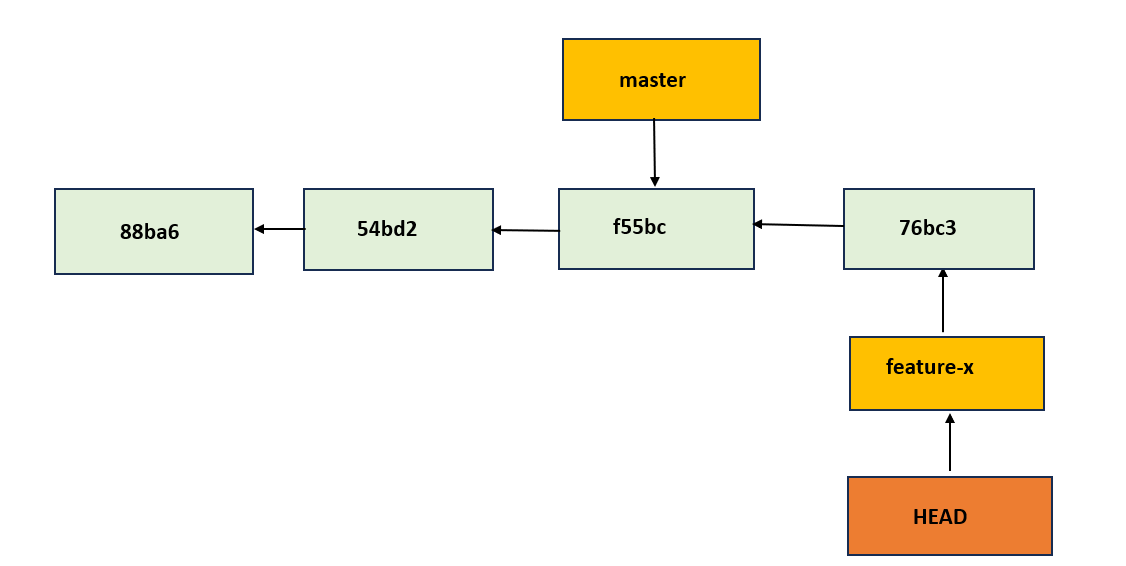
With the recent commit, the feature-x branch is now moving forward.
Use git checkout to go back to the master branch :
$ git checkout master
This activity fulfills two goals:
The HEAD pointer is moved to point to the master branch.
It basically undo all changes made to the feature-x branch by reverting the files in our working directory to match the snapshot that points to master branch.
By navigating between branches, we can independently work on various features or tasks and keep distinct development lines until we're ready to merge changes back into the main branch.

Let us demonstrate how to make changes and have a divergent history in Git:
Let's start by making some edits to a file and committing them to the current branch (let's say feature-x branch):
$ vim test.htm  # Make some changes
$ git commit -a -m 'Make other changes'
We have edited the file test.htm and committed the changes with an update message by using these commands.
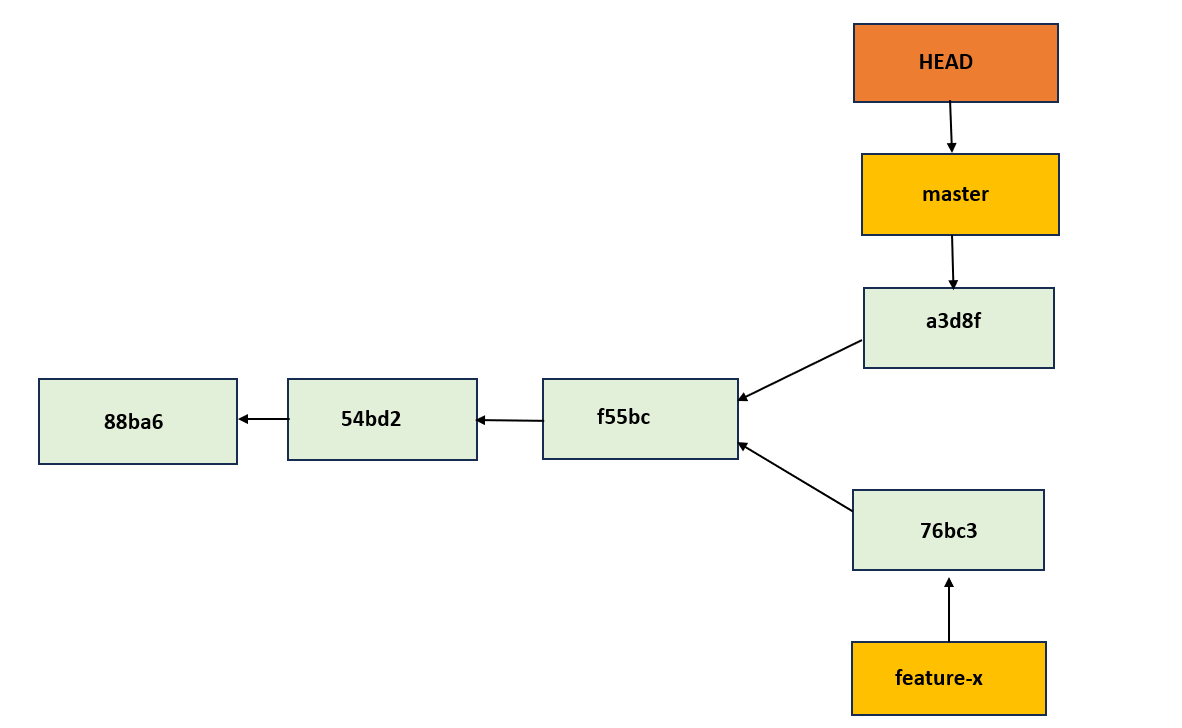
Our project history is now diverging. We've made changes to a branch (feature-x), switched to it, and then made more changes by switching back to our main branch (master), for example.
As each set of modifications is contained in its own branch, we may alternate between them and merge them together when we are ready.
We can use the git log command with a variety of arguments to see the divergence history and branch pointers:
$ git log --oneline --decorate --graph --all
The commit history of our account is presented in a condensed, elegantly designed graphical format by this command.
This also indicates the locations of all branch pointers, including HEAD, and the trends in branch divergence.
Since Git branches simply point to specific commits, they are lightweight and easy to create and delete.
Unlike older version control systems that require duplicating entire directories due to fewer metadata updates, Git's branching process is nearly instantaneous.
This efficiency encourages developers to frequently utilize branches for effective organization and management of their work.